Light For Visual Artists

Chapter 1 - Basic Principles
Throughout this article I will be using a diagram of a white ball on white card to demonstrate how light behaves in different everyday situations:

Here it illustrates a sunny afternoon. The main source of light is the sun, whilst the blue sky supplies a second source of light with very different characteristics. Some light is also bouncing between the white base and the ball and supplies a third source of light.
The brightest light is coming from the sun and is white light emanating from a small source, which causes it to cast sharp edged shadows. The second source, the blue sky, is a very large light source and as a result has very soft shadows (which in any case are completely masked by the direct light coming from the sun). I will go into more detail later about light sources and shadow size, but for now just remember that the smaller the source of the light, the harder the shadows.
The light coming from the blue sky has a very strong colour cast which affects everything in this scene. The shadow cast by the ball is blue because it is illuminated by blue skylight, since the ball is shielding it from the white light of the sun. The parts of the ball which aren't in direct sunlight also take on a blue hue because they are lit by the blue sky.
Finally the light that is reflected between the card and the ball is also predominantly blue (even though the card and ball are white) since it is blue skylight that is being reflected by the white objects. The surfaces which are closer together receive more of this reflected light than areas which are further apart, therefore the bottom part of the ball is lighter than the centre because it is nearer the white card.

The darkest areas in the image are the base of the cast shadow and the border between the areas in sunlight and shade on the ball: this zone is called the terminator. The base of the cast shadow is very dark because it receives no sunlight and the ball is also masking it from most of the skylight and bounced light. The other end of the cast shadow is lighter because it is receiving more light from the sky and also bounced light from the ball.
Why is the terminator the darkest area on the ball?
Partly because of the effect of contrast, being so near to the very bright side of the ball in sunlight makes it appear to be darker, but also it is receiving less of the bounced light which is being reflected by the white card. So unlike the rest of the ball, which is receiving either full sunlight or light reflected from the white card, its main source of illumination is the blue sky. It is the area in between the main light (the sun) and the fill light (the reflected light from the card).
Why is the light from the sky blue?
Visible light is made up of tiny particles called photons, these particles have different wavelengths depending on their colour: blue light comprises of particles with shorter wavelengths whereas red light is made of particles with longer wavelengths.

White light from the sun is made up of a continuous spectrum of colours which, conventionally, is divided into the colours of the rainbow (with progressively longer wavelengths: violet, indigo, blue, green, yellow, orange and red). It is the mixture of these colours that produces white.
However what happens to light when it travels through the atmosphere of the earth is that the shorter wavelengths of light become scattered. Our atmosphere is made from various gases and the atoms and molecules that these are formed from are suspended within it. Photons travelling through the atmosphere physically collide with these atomic particles and a collision will deflect the photons and make them bounce in another direction. Shorter wavelengths are more likely to be deflected than longer ones, so that the photons which are scattered in all directions by these collisions are predominantly blue.

On a cloudless day blue light scattered by the earth's atmosphere shines on everything around us.
Longer wavelengths of light, such as red, can travel further through the atmosphere without being scattered. This is why sunsets are red: as the sunlight travels through a thicker layer of air to reach us when it is lower in the sky a lot of the blue light is lost from scattering, and the remaining light is predominantly red.

The sun's light glows red at sunset because the shorter blue wavelengths have been lost due to scattering. *Note however that the scattered blue light is reflecting back from the eastern sky and acting as a fill on the foreground waves.
The effect of bouncing blue photons in all directions is that the atmosphere is actually glowing with blue light, an effect which is clearly visible from space. This blue light is strong enough to illuminate areas that are not in direct sunlight, which is why you can still see when you are in open shade.

The shadows in this photo have a strong blue cast because they are being illuminated by the blue sky.
Light bounces
When light hits a surface it either bounces or is absorbed by it, depending on what colour that surface is. A white object will reflect all wavelengths equally, whereas a black object will absorb them all. When white light hits a red surface the blue and green wavelengths are absorbed and the red light is reflected (I'm just using the primary colours, rather than the full spectrum here, for the sake of simplicity).
So if white light hits a red surface the photons this surface reflects will be red. When these photons hit the next surface in their path they will therefore be illuminating it with red light. This phenomenon is called radiance, and the colours of adjacent objects will have an affect on each other because of this.

The light reflecting from this venetian blind is projecting the wood's colour onto the wall.
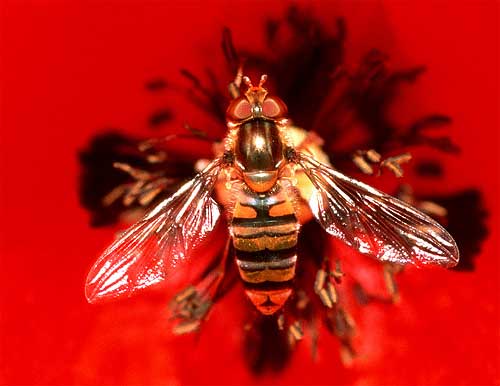
The rear abdomen of this bee has been strongly coloured by red light reflecting from the poppy.
Radiance is usually a subtle effect, and it takes a great deal of light for it to become apparent. In soft or dim light it may not be visible at all, however in bright light it can add a lot of colour to the objects it affects. If light is reflecting between objects of the same colour it can create a very saturated effect as the bounced light reinforces the existing colour of the underlying surface, making the colour glow vividly - you can sometimes see this phenomenon in bright daylight.
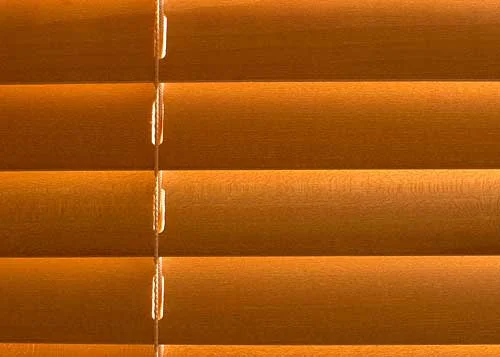
As the light bounces between these wooden slats the colour of the wood is enhanced by the fact that light of the same colour is reflecting back onto it. The result is that the coloured light and the underlying surface combine to create a glowing and saturated version of the wood's existing colour.
High key and low key
How we choose to represent a scene is subjective and open to interpretation. Most situations will have a balance between light and shade that produces an average or medium grey because that's what we perceive as normal. However there are some situations where the natural order of things tends towards either extreme of light or dark, such as fog or snow on the one hand, or night time on the other. Alternatively an artist might choose to emphasise one of these extremes for visual impact, or to convey a specific feeling.
High key
High key images have a predominance of white or very light tones and tend to look light and airy. High key lighting is often (but not always) soft, and detail is generally low. In nature high key lighting is found in fog and snow, where even shadows are light due to the amount of reflected light bouncing around.
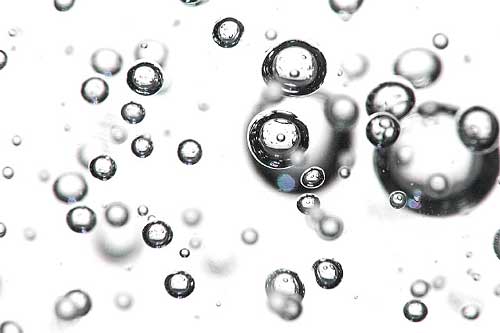
The stark simplicity of this photograph is created by the very limited palette it uses: white and some dark greys and blacks.
Low key
Low key images have by their very nature very little light in them. Contrast is usually high and the lighting hard. Low key lighting can create a very moody atmosphere and is often used to this effect. The most obvious setting for low key lighting is night time, but it can also be found in other situations such as storms and in interiors.

The drama of this image is emphasised by the low key lighting.
White balance
Most light sources that we encounter in everyday situations have a colour cast, however our brain is very good at filtering this out. As long as there is a vague mixture of the three primaries in the light our brain interprets it as white. Even under lighting with very strong colour we have the ability to filter the information our eyes receives and make sense of the colours so that we perceive them in a relative rather than absolute manner.
The most obvious way of demonstrating this is to use a digital camera with the white balance set to daylight: this is a neutral setting which will reflect the colours that are actually there. In the example below I have shot the image with a window acting as the light source. The light is coming indirectly from an overcast sky and is relatively neutral.

In the next photograph I have closed the blinds and used a standard household 60 watt lightbulb as my light source:

The strength of the colour cast in this image may well have surprised you, since we don't tend to perceive tungsten lighting as being such a bright yellow/orange. Our brain converts the colours to make them resemble the first image, but in this case it's the camera which is painting the true picture.
One very easy way of confirming this fact is to look at windows from the outside: next time you are outdoors during the evening look at the colour that comes from houses and you will see that their interiors are a bright orange. When we aren't directly under the light source we are able to see its true colour.
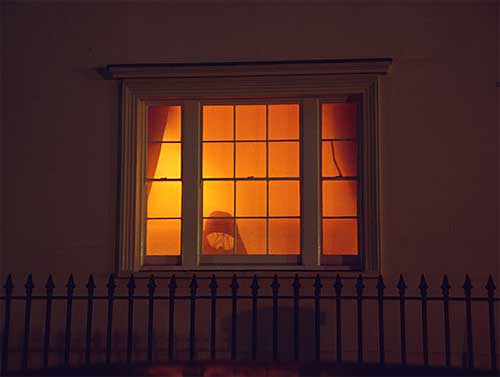
Viewing tungsten lighting from outdoors helps to reveal its true colour, from here it looks bright orange.
Something very similar happens when we are standing in open shade, where the light is very blue. We perceive the light as being neutral, but if we step back and look at the shade from under sunlight the blue cast is much easier to see. There are many other situations where lights have a strong cast: fluorescent light is often green, street lighting very deep orange, evening sunlight progresses from a light yellow to a deep red etc…

From within open shade we perceive the light as being neutral, but stepping back reveals it to be a deep shade of blue.
3 point lighting and why it sucks
3d tutorials often describe the classic 3 point lighting set up and encourage beginners to use this as an effective way of lighting their scenes. It was originally developed as a way of lighting photographs and its one benefit is that it is easy to learn and understand. It comprises of a bright main light coming from one side, and dim fill light coming from the opposite side and a back light behind the subject which is used to pick out edges and highlight form.
The biggest problem with this set-up is that it is artificial and doesn't reflect reality. The use of back lighting especially should only be considered if you are looking for a specific effect since it is so dramatic and recognisable. Back lighting can be very effective but it should be used with flair rather than blindly applied to every situation. The kind of light that 3 point lighting creates simply does not exist in nature and therefore it looks fake. The fact that it is taught in so many textbooks also lends it an air of cliché and it has therefore become tired and boring.
It has long since fallen out of favour with photographers and film-makers anyway, so you will rarely see it in product shots or mainstream films. If you are looking to light an environment or an object it is far better to try and put some of your own creative thought into your lighting and study what happens in nature to then devise your own solution.
Everyone has seen those cheesy photographic studio portraits that rely on formulaic lighting: they all look exactly the same as each other because the photographer uses the same lighting every time. The result is a boring and lifeless photograph, if you want your own art to avoid cliché and be cheese-free then avoid textbook formulas and think for yourself.

